.svg)

.png)

Goal: Establish a process to find guest blogging opportunities, reach out, and easily create content to acquire backlinks.
Ideal Outcome: You’re able to consistently build high-quality, not spammy, contextual backlinks to your site.
Prerequisites or requirements:
- You’ll need to be familiar with how to perform keyword research and possibly have a keyword strategy already. Check out SOP 011 to learn how to do that.
Why this is important: Link building is an essential element of SEO. If you want to rank for competitive and queries, you will need to build links.
Where this is done: In your Chrome web browser (using the Chrome extensions described in the SOP), in BuzzStream, and in TextBroker.
When this is done: Whenever you want to build links to your site.
Who does this: The person in charge of SEO / link building for your site. You can also outsource some of these tasks to a virtual assistant or freelancer.
- Environment setup
- Install the SimilarWeb Chrome extension
- Install the Mail Hunter Chrome extension and set up an account
- Create a Buzzstream account (or get access to it if your company already has one.) We recommend the Group plan since it allows you to send bulk email campaigns—you get access to a 14-day trial.
- If you will not write the guest posts yourself, create a Text Broker account.
- Perform keyword research
If you are not sure about how to perform this step, you should read SOP 011.
- Determine the topic / searcher intent that you want to build links around. Each of these link building campaigns will be limited to a single searcher intent.
For example:
- “Who creates emojis” and “unicode consortium” have a similar searcher intent.
- “Who creates emojis” and “emoji chrome extension” have different searcher intents.
- Create a list of all the keywords associated with the searcher intent you selected.
- Find / create content that you can repurpose multiple times
To increase your success rate when guest posting, you need to provide other websites with high-quality and original content, since most webmasters/editors will require the content you provide to be unique.
For this to work at scale, you have to create or select an existing high-quality blog post that will be repurposed or rewritten by third-party writers.
These are some recommended specifications for this content:
- The blog post must be highly relevant to the searcher intent you identified in the previous step.
- The blog post should be at least 800-words long.
- Include external links and references to authoritative sources—don’t just link to your own site.
- When possible, reference relevant data or statistics.
- Improve readability of the post by keeping paragraphs short (no longer that 3-4 lines per paragraph.)
- Include relevant images and graphics.
- Find guest posting opportunities (prospecting)
Note: If you can afford it, we recommend that you hire a freelancer or virtual assistant to perform this step for you as it can be very time-consuming.
- Open the Guest Blogging Campaign spreadsheet.
- Go to “File → Make a copy” and make a copy of the spreadsheet.
- Update the name of the file by changing “[Searcher Intent]” with the searcher intent you selected for the campaign.
- In the “Keywords” worksheet, add the list of keywords associated with your campaign to column A.

- Verify that columns B, C, D, and E were automatically populated/updated (as shown above.)
- Open Google.com
- For the first keyword, copy the cell under the “Query #1” column, and paste it in the Google search field.
- Visit the first 50 search results (pages 1 through 4 of Google’s search results) and use the following criteria to qualify an opportunity:
- You haven’t included this root domain in your prospecting campaign yet.
- The page does not belong to one of your competitors.
Important: If you hired someone else to do prospecting for you, make sure to give them a comprehensive list of competitor’s websites. - The page is a blog post (and not a sales page for a product, a website’s homepage, a blog directory, a contact page, a social media post… you get the point.)
- The content of the blog post is relevant to your query. For example, if my query is “who makes emojis” a blog post about “the coolest emoji t-shirts” would NOT be a relevant result.
- The website has published at least one new blog post in the last 3 months.
- Check that the site receives at least 5,000 visits per month. You can do that by using the Similar Web Chrome extension and checking the “Estimated Visits” metric.
Important: If the page does not meet ALL of these criteria, skip it and move on to the next result.
- If the page meets all of the criteria above, look for the email of the site owner or editor (DON’T look for the contact information of the author of the post, because they will be guest authors.) Here are the 3 things you can do to find this information:
- Look for a “Contact us”, “Contribute to our blog”, or similar link in the top navigation, sidebar, or footer of the site.
- If you find the name of the website owner / editor, try looking for their Twitter profile and check if they have an email listed on their profile.
- Use the Mail Hunter Chrome extension. If you are using the free version of Email Hunter, only use this as your last option since you get only 150 requests per month.
Important: Don’t spend more that 3-4 minutes attempting to find the email address of the site owner / editor. If you can’t find it quickly using the three methods above, skip the site and move on to the next one.
- If a page meets the selection criteria (prospecting step #8) and you’re able to find contact information for the site (previous step), then record the data for the page in the “Prospecting / Outreach” worksheet. You will need to input the following information in that sheet:
- Page URL: self explanatory.
- Blog post title: be sure to write this down using title capitalization (i.e. capitalize words with five or more letters), you can use this simple online tool to easily obtain the proper capitalization.
- Blog post author: full name of the person who wrote the blog post, with proper capitalization.
- Website name: the name of the site where the blog post was published. Use proper capitalization as well.
- Editor / owner first name: this is an optional field, if the name is not available, then leave the field empty. Use proper capitalization as well.
- Editor / owner email: the email address of the contact you found in the previous step.
You don’t need to fill out the “Status”, “Notes”, or “Guest post URL” columns yet.

- After you’re done with a query, move on to the next one on the same row. After you’re done with all the queries in a row, mark the keyword as used in column F, and move on to the next row.
- Launch your outreach campaign
- Open Buzz stream and create a new project
- Set up your project:
- Name of your project: Use the following nomenclature “Guest Blogging Campaign - [Searcher Intent]”
- Select the team members for the project:
- If someone else will be helping you perform outreach, you can choose to share the project with them (you can also add them later.)
- If you are performing outreach yourself, you can just leave the default option selected.
- Add the URL you are building links to.
- Choose to track links only to the specified URL.
Note: This is the preferred option for this type of campaign (guest blogging) because you will be the one placing the links in the post. - Make sure that the option to receive a backlink report is selected.
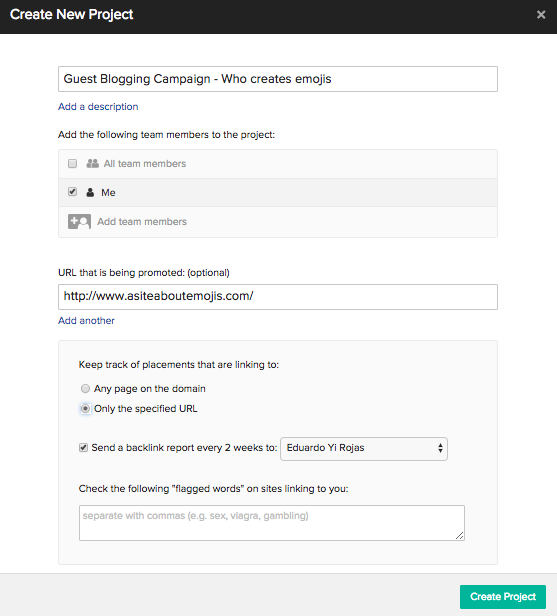
- Click on “Create Project”
- Go back to the campaign control sheet, navigate to the “Prospecting/Outreach” sheet, and click on “File → Download as → Comma-separated values (.csv, current sheet)” to download a .csv file.
- Go back to Buzz stream and click on “Add Websites.”

- Choose to upload a CSV and select the “Match My CSV” option.
- Once you have uploaded the .csv file, you will have to match your columns with the content in each of them. This allows BuzzStream to pick up the information and use it to customize your emails, according to your instructions (as you will later on see).

- Except for the columns that are already matched 100%, you will most likely have to choose “-New Field-” for each of the other columns.
- Furthermore, you will most probably not need the last three columns, so you can just ignore them.
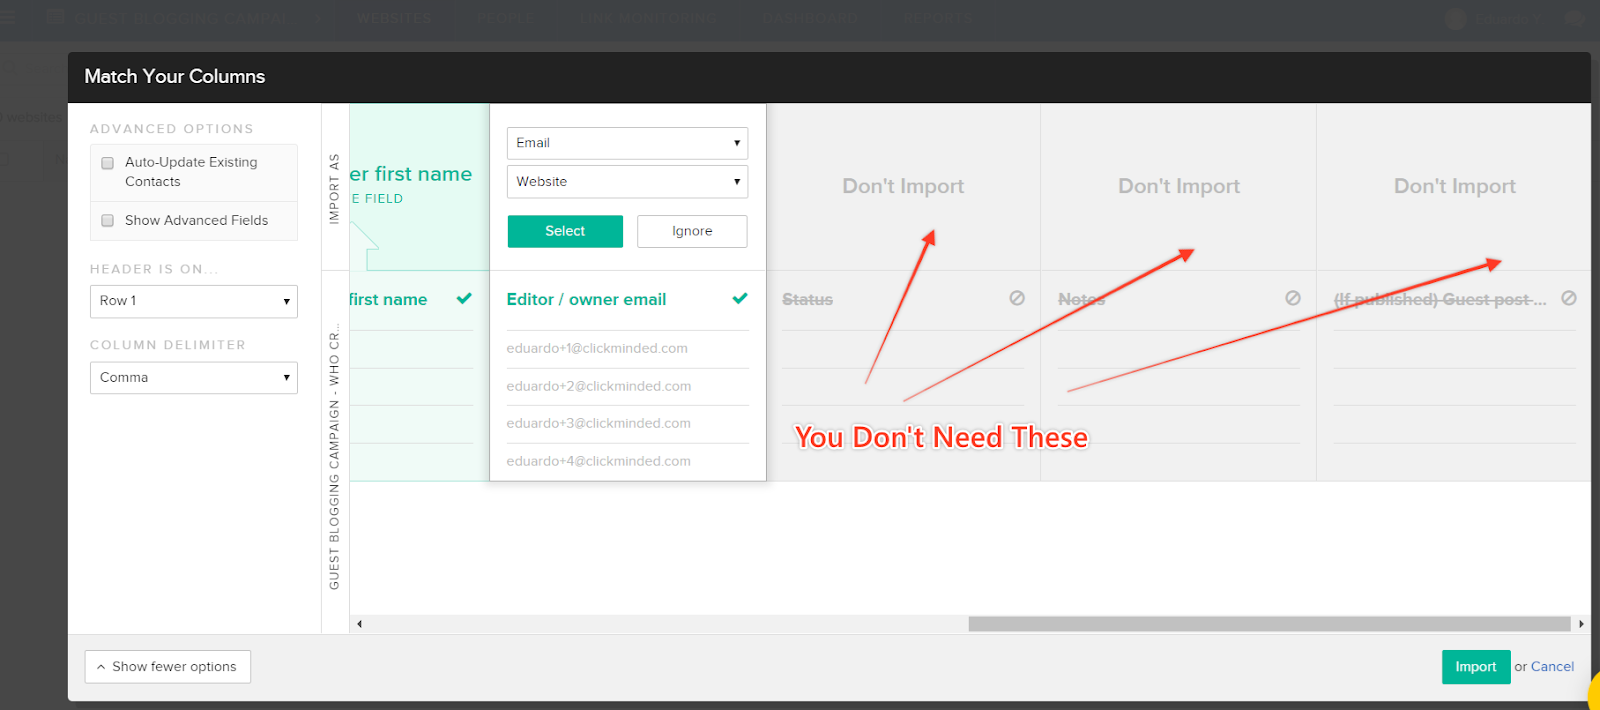
- To import your data into BuzzStream, click the “Import” button in the bottom right side of the screen.
- When your data is imported, you can move on to creating a sequence of emails that will be sent according to the aforementioned data and your specific instructions.
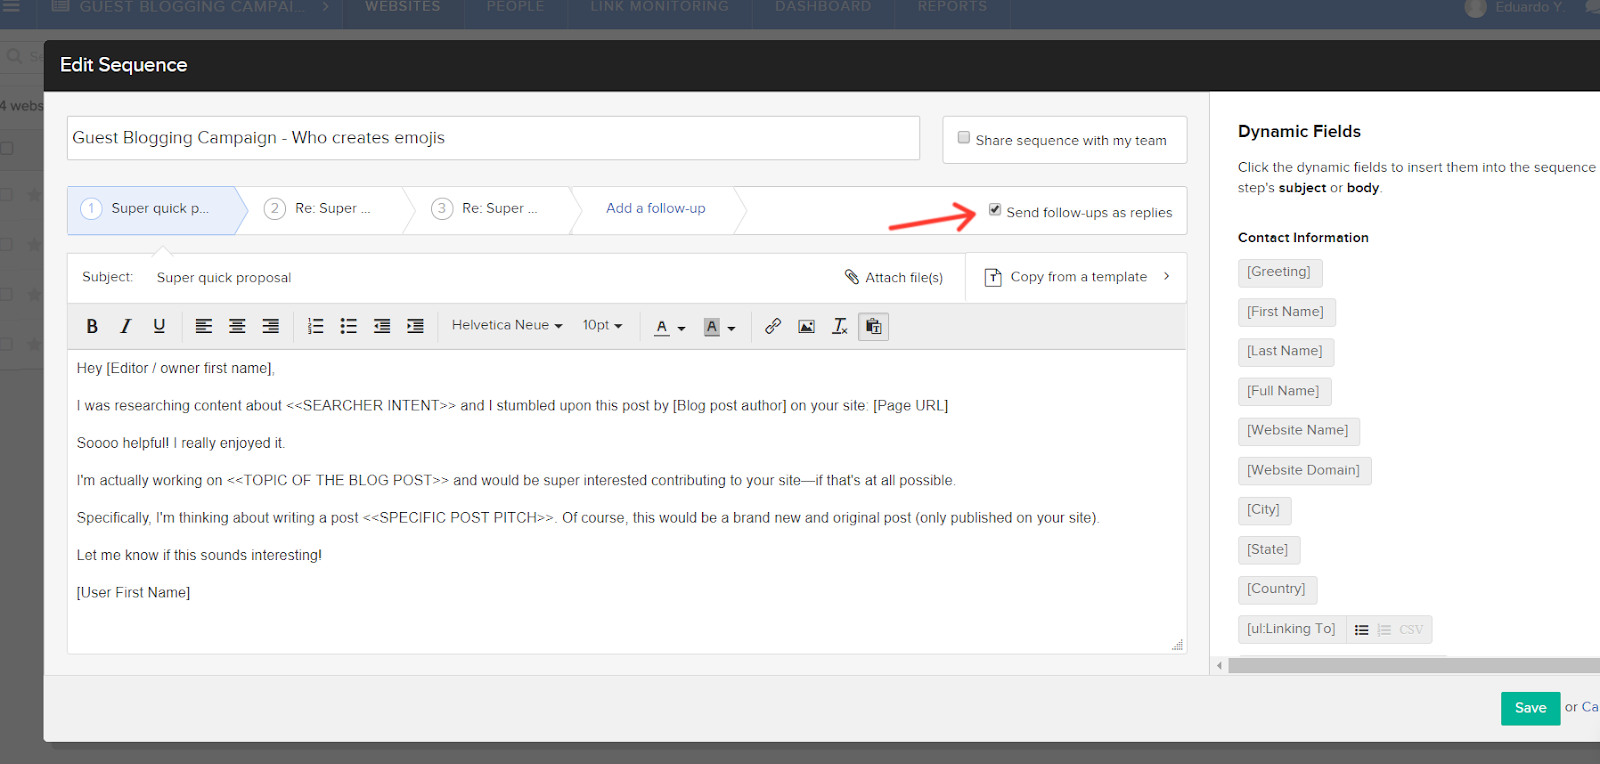
- Go to Outreach -> Manage Outreach -> Create New Sequence (if you don’t have one which is already created and you want to use).

- Name your sequence. Our suggestion is that you name it: “Guest Blogging Campaign” + the search intent you want to work on (e.g., in our example, this became “Guest Blogging Campaign - Who creates emojis”).

- On the right side of the screen, you will see the dynamic fields BuzzStream provides. You can use these fields in your email templates to automatically add data you imported with your .csv file (e.g. the names of the editors).
- In the example above, you can see how we added the the “[Editor/ owner first name” dynamic field into the email template.
- Pay attention: the template we used is a general example. Our advice is for you to create a template of your own with each email outreach campaign. Doing this will add a unique voice to your emails, making them more personal (and thus, more likely to receive a reply). However, if you need inspiration, here’s the template we created for our example:
“Hey [Editor / owner first name],
I was researching content about <<SEARCHER INTENT>> and I stumbled upon this post by [Blog post author] on your site: [Page URL]
Soooo helpful! I really enjoyed it.
I'm actually working on <<TOPIC OF THE BLOG POST>> and would be super interested contributing to your site—if that's at all possible.
Specifically, I'm thinking about writing a post <<SPECIFIC POST PITCH>>. Of course, this would be a brand new and original post (only published on your site).
Let me know if this sounds interesting!
[User First Name]”
- Furthermore, in the given example, you will see text marked with “<< >>”. That is where you should enter the necessary details, according to your particular data (e.g. in our example, the “<< SEARCH INTENT >>” was replaced with “emoji marketing”.
- Also, you should keep in mind to use the [User First Name] dynamic field as a signature, especially if there are multiple people using the same BuzzStream account. Doing this will allow everyone on your team to use the same template and still have them customized with their name when they have to run an outreach campaign.
- Once done with the first email, you should add two follow-up emails as well. BuzzStream allows you to do this easily and even set up very precise parameters (e.g. sending the first follow-up email if the recipient doesn’t reply in 3 days).
- The process stays the same as with the first outreach email, but the text should change, so that it’s adapted to the situation. Following, you will see the texts we used for the first, respectively for the second follow-up. Again, same as with the original email, our suggestion is that you use texts created by yourself, as this will make the entire campaign more credible.
Follow-up 1:
Hey [Editor / owner first name],
Just following up on my last email. I'd love to contribute to your blog :)
I can send you a draft of the post in the next few days if you're interested! Also happy to accommodate to any editorial guidelines you want to me follow.
Cheers!
[User First Name]
Follow-up 2:
Hey, [Editor / owner first name]!
Thought I'd try to reach out one last time. I'm super excited about working on this post and, if possible, would love to publish it on your site.
Thanks for your time!
[User First Name]
- Make sure the “Send follow-ups as replies” box is ticked because this will make your emails look more natural (and thus, it will make editors and site owners trust you more).
- When your email templates are all set up, it is time for you to begin the actual outreach. You can do this two ways:
- Send Individually. This is the recommended option if you are using this outreach campaign for the first time (or if you are using BuzzStream for the first time, for that matter). To do it, follow these steps:
I. Select the sites you want to outreach to.
II. Click on Outreach -> Send Individually
III. Click on Start Outreach.

IV. Check to see if all the details and the text are correct.
V. Click on Start sequence now.
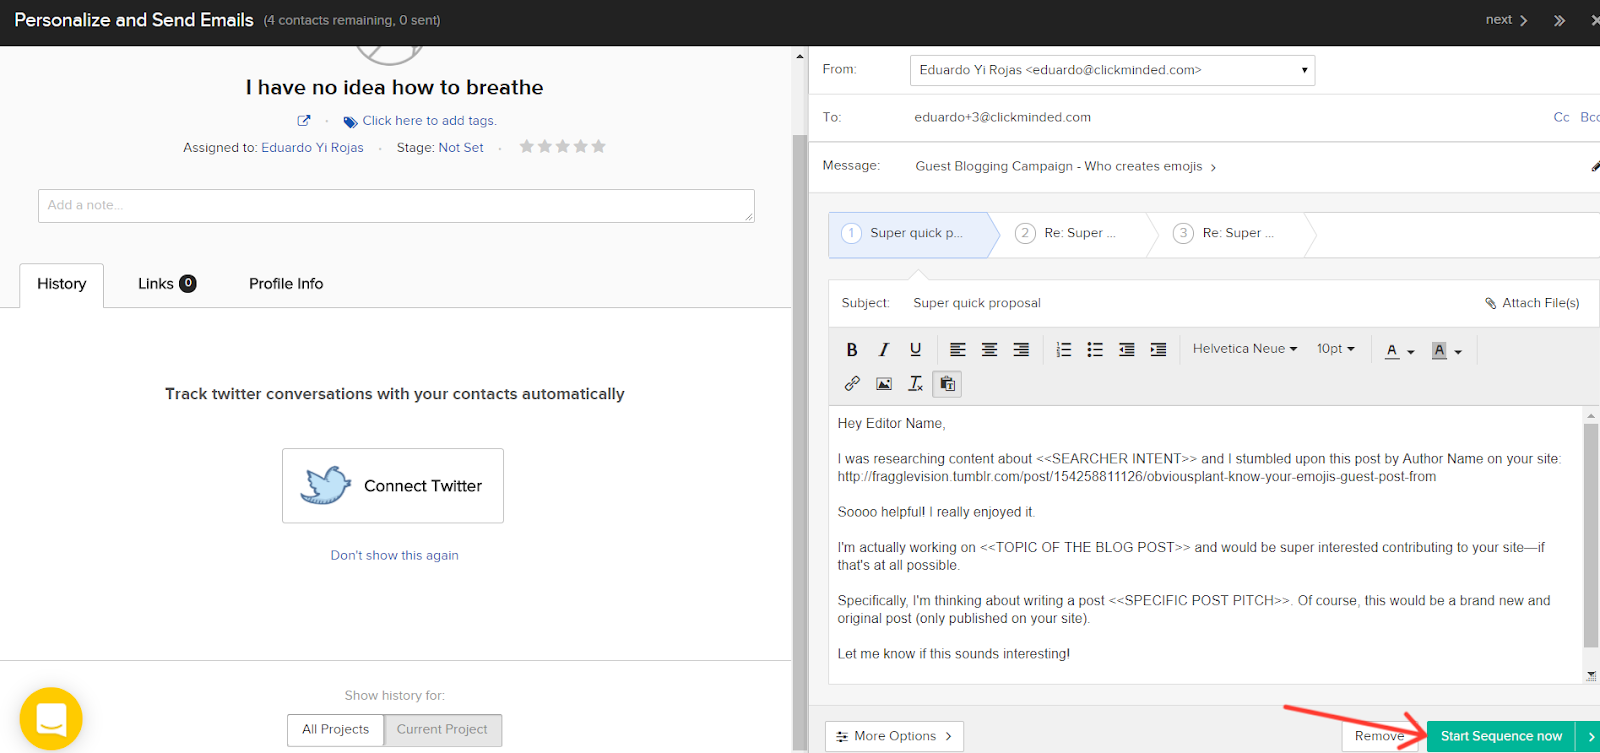
VI. Repeat the same process with all the websites on your list.
- Bulk Send. This is an easier, less time-consuming method, but it is generally recommended if you are already familiar with your campaign and/or BuzzStream. To go on this path, follow these steps:
i. Click on Outreach -> Bulk Send.
ii. Choose a sequence or template.

iii. Check to see if everything is correct.
iv. Click on Next: Review.
v. Check again to see if everything is correct.
vi. Click on Next: Confirm.
vii. Check to see if the settings are correct (in case you modified anything in the previous steps). And yes, this is the last check - we can see the eye rolls from here! :)
viii. Click Send Now.

Wait! There’s more… :)
- Replying to emails
Simply launching an outreach campaign will not do anything for your website’s SEO - not if you don’t make sure to actually get your links on other, high-ranking websites.
So, once your outreach emails are sent, you should be ready to reply to whatever replies you get. Here are the steps to follow if you want to make the most out of this stage of the link-building stage:
- Reply to emails as soon as you receive them. You want to show editors and site owners you are genuinely interested in working with them. Plus, leaving these emails “for later” can be quite risky—chances are they’ll soon get lost in a sea of random newsletters and chain emails. :)
- Most of the times, the replies you receive will fall into one of the following categories:
- Positive reply. If one of your outreach email recipients replies saying they would like to host your guest post, they will most likely provide a process of their own you’ll need to follow to submit your article (see more on how to create content below in this SOP).
- Negative reply. If one of your targeted site editors or site owners reply with a negative answer, mark them as rejected in the spreadsheet.
- Charging you. If your recipients want to charge you for publishing the guest post, politely turn down their offer.
- No reply. If your outreach email recipients don’t reply, they will receive a follow-up email via BuzzStream, according to the sequence you created and the settings you chose for your campaign.
- Update the tracking sheet based on their replies (the “Status” and “Notes” columns in your tracking spreadsheet).
- Writing the guest posts
Writing guest posts can be a time-consuming process, so we recommend using a content marketplace to be able to do this at scale.
Here are some steps to help you with this process:
- Go to Text Broker and log in (create an account if you haven’t yet.)
- Create an open order for a blog (click on “Place Order” under the “Open Order” column, then click on “Blog” from the options that appear on screen.
- Create a folder for the project and name it. Our suggestion is to name it “Guest Blogging Campaign - [Searcher intent]” and follow the same structure for the future as well.
- Select the category your blog post belongs to.

- Enter the order title. Our suggestion is to use a standardized nomenclature that will allow you to organize all of your future guest blog orders. For example, you could use “Guest Blog - [Name of site]”.
- Enter the target keyword you want to use in this article.

- Under the order briefing, copy and paste our reusable guidelines:
- You will find them here.
- You can just copy and paste these in the order briefing, but make sure to customize the fields in yellow with your particular needs.
- Submit the order.
- When you receive the order, check it for coherence, style, and readability.
- If you need changes, submit edit requests to the writer.
- When the article is final, download it and add a link to your website.
- Submit the article to the website you negotiated your guest post with.
- If the site owner or editor asks for edits, perform them and submit the article again.
- Once the guest post is fully published, remember to update the “Guest post URL” column in the tracking spreadsheet.
Now, just keep going!


%20(2).jpg)
